Before you begin to map appointments, it is important to complete a few steps. Setting up holidays and vacations, creating your Appointment Types and creating your Default Care Schedule will ensure mapped appointments are scheduled properly into the future. To help in the mapping process, you may also want to link families to allow you to map appointments for all family members at once.

To schedule Multiple Appointments (map):
- Find the patient: it is necessary to have the patient profile open first to schedule appointments
- Click: the APPOINT button on the patient profile
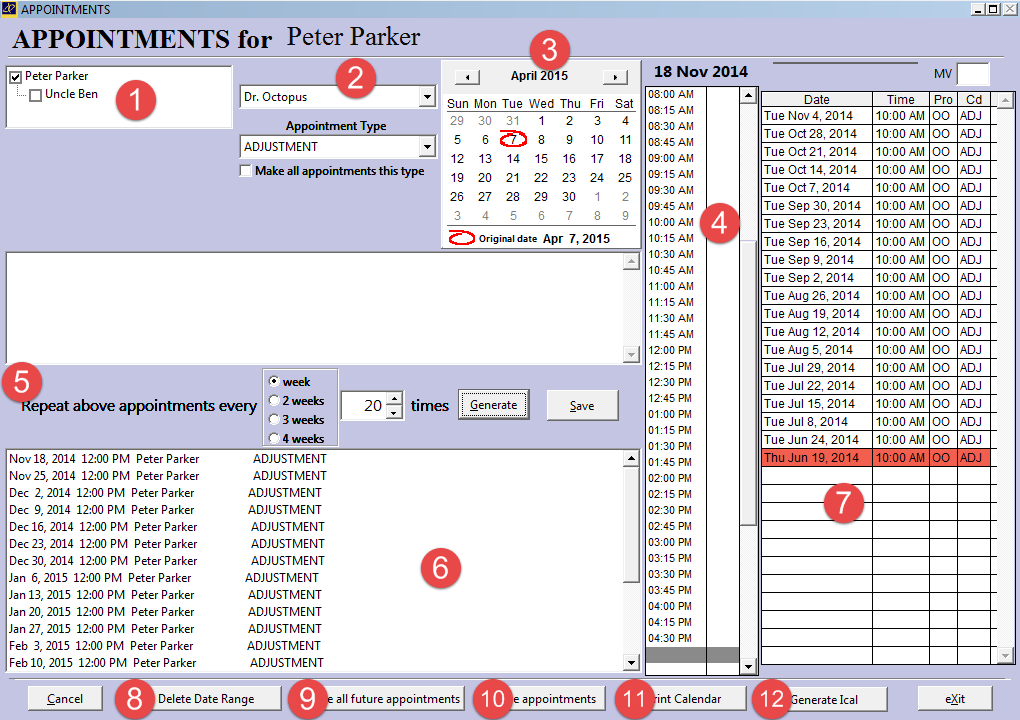
The APPT button opens the Appointment Mapping screen:
- If mapping a patient, linked to a family, the family member names appear here – check patients to be mapped identically here, uncheck to exclude from this mapping NOTE: family maps may not necessarily coincide depending on your Default Care Schedule setup and specific patients past visits. Ex: Your Default Care Schedule may be for every 12 visits to schedule a Re-Exam. Patient 1 (in the family) had their re-exam recently because they have been in care longer than patient 2. When you map appointments for the future, Atlas will attempt to schedule each patient according to the Default Care Schedule. Specific patient Appointments can be changed once mapped
- Choose the Provider from the available drop down menu
Choose the Appointment Type to start the mapping with: you can override the Appointment Types being created by clicking the ‘Make all appointments this type’ box - Choose the Date for the first appointment
- Choose the Time for the first appointment NOTE: repeat steps 3 & 4 to create the schedule for the patients first week. Example: Lets map a patient for care at 3 times per week for 6 weeks, then 2 times per week for 6 weeks and finally 1 time a week for 26 weeks
- Choose the Days and Times the patient wants for their 3x appointments. We will use the example of Monday at 8am, Tues at 8am and Thursday at 8am.
- Proceed to Step 5 once your first week map is completed
- This area is where we determine how to repeat schedule the created appointments. Choose how often to repeat the map and how many times to repeat the map NOTE: when repeating keep in mind you have already created the ‘first’ week of care – if you are choosing to map for 6 weeks, you would only repeat 5 more times for a total 6 weeks.
Click GENERATE to create the map automatically – you will see the appointments being created in area 6 on the screen – note the Default Care Schedule Appointments also being created.
NOTE: repeat these steps to map the 2x per week appointments and so on.
MOST IMPORTANT – ONCE ALL APPOINTMENTS ARE MAPPED CLICK ON THE SAVE BUTTON TO WRITE CHANGES TO THE PATIENT APPOINTMENT LEDGER - Mapped appointments can be deleted from here before being saved to the patient file.
- Check the Appointment Ledger before exiting to ensure accuracy. Appointments can be manipulated (deleted, rescheduled, changed) from this ledger before exiting.
- Click DELETE DATE RANGE to delete all appointments within a specified date range. Upon clicking this option, you with be prompted to specify the date range of appointments you wish to delete, once the date range has been specified click the Delete Appointments button.
- Click DELETE ALL FUTURE APPOINTMENTS to remove all the patients future appointments from the database – helpful if a patient ends care or you have to change all of a patients mapped appointments
- Click MOVE APPOINTMENTS to change a patient’s appointments in bulk
- Click PRINT CALENDAR to create a printout for your patient – this opens a Print Preview for you first See Reports for example.
- Click GENERATE ICAL to generate an ical file that you may then send to your patient. The Ical file when opened by your patient will put all the patients appointments into their electronic calendar. This file format works for a wide variety of devices such as PC's, Laptops, Tablets, Cell Phones and Smart Phones. When creating this file, you can choose where you would like the file to be saved to. In earlier versions, it will be saved to your ACS folder.
Atlas will prompt you to SKIP or RESCHEDULE an appointment if it falls on a scheduled Holiday, Vacation or Exception Hour. It is very important before you begin mapping to schedule your clinic ‘time off’ to avoid problems.
Click CANCEL in the bottom left corner to exit without saving changes
Click EXIT when complete to leave this screen and save all changes
Click PRINT CALENDAR to create a printout for your patient – this opens a Print Preview for you first
See Reports for example.