Once images have been added onto a Patient file, you can edit them as needed. It is possible to edit the Image Properties (File Properties) or edit the Image directly through mark-ups (adding lines, text or color variations).
You can also move the Image around in the specific Patient file or move the Image from one Patient to another.
The Image Editing Options can be accessed from the CHAS by opening the desired Patient file and clicking on the Image tab. Under that tab you will see the EDIT IMAGES button.
The Image Editing Options can also be accessed from the VTC via two methods. First, you can click on the Imaging button and choose the option to EDIT or you can use the Touchpad button EDIT IMAGES to access the same screen.
The EDIT screen is comprised of two main areas.
These two areas offer access to different functions for Editing.
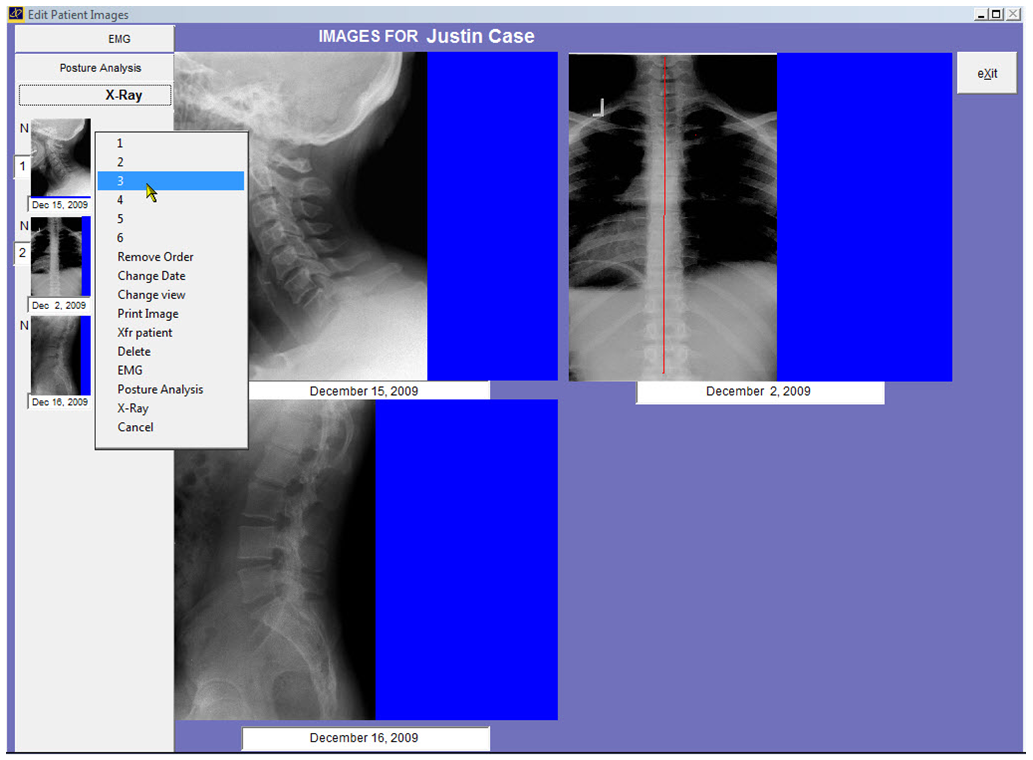
Left side (grey area) shows the Thumbnails
- The Thumbnail area is further separated into the 3 different containers you can organize Images into: X-Rays, Posture Analysis, EMG – click on the tab to access the Images in each
- On any of the Thumbnails you can Right Click to access the Edit Images menu options
- Change the Order the Image appears on the VTC by selecting the desired number
NOTE: only 4 images can be viewed initially through the VTC, however you can access all of the images as described later in this section. We recommend organizing the 6 most recent images - Change the Date of the Image
- Change the View: this option relates to the Compare Feature covered later in this section
- Print Image: sends the selected image to the default printer
- XFR Image: transfers the selected image to another Patient file. This is helpful if you imported the image onto the wrong file.
- Delete: to completely remove the image from the Patient file.
- EMG/POSTURE ANALYSIS/X-RAY: moves the selected image to another container.
- Cancel: takes you out of the menu.
- Change the Order the Image appears on the VTC by selecting the desired number
Right Side (purple area) shows the Standard Views
- There is no Right Click function on the Standard View Images
- Left click on a selected Image to make edits to that image
- In the EDIT screen, click on the desired EDIT function to add it to the image
- Be sure to SAVE the changes you make before you EXIT EDIT
Atlas also gives you the option to open an Image file using third party software for editing (such as MS Paint, Adobe Photoshop or Irfanview). It is necessary to have the desired software installed on the PC. You will also need to tell Atlas where to find the desired program.
![]()
Setup > Initial Setup > System Information
Under the Imaging/Articles tab select ‘Other’ at the Image Editor selection. Next, point Atlas to the desired editing program executable file. When you choose to EDIT a file now, Atlas will push the Image into your selected image editor.
You can now access the Images in a Full Screen Mode through the VTC by Left Clicking on the Image. Additional options and functionality are available when using the Touchpad to access Images. Refer to the section covering Touchpad Functions for details on how to do this.