Home > Initial Setup > Providers Setup


SETUP > PROVIDERS
The first step in successfully configuring your new software is to properly setup your Providers list. This will reflect current Doctors, massage therapists, etc that will be using the Atlas schedule.
To ADD a new Provider, click the Add button at the bottom of the screen.
To EDIT any existing Provider details, click the Edit button at the bottom of the screen.
There is also an option to view Providers previously marked as 'Inactive' by using the Show Inactive button.
NOTE: your screen may look slightly different based on your Insurance setup.
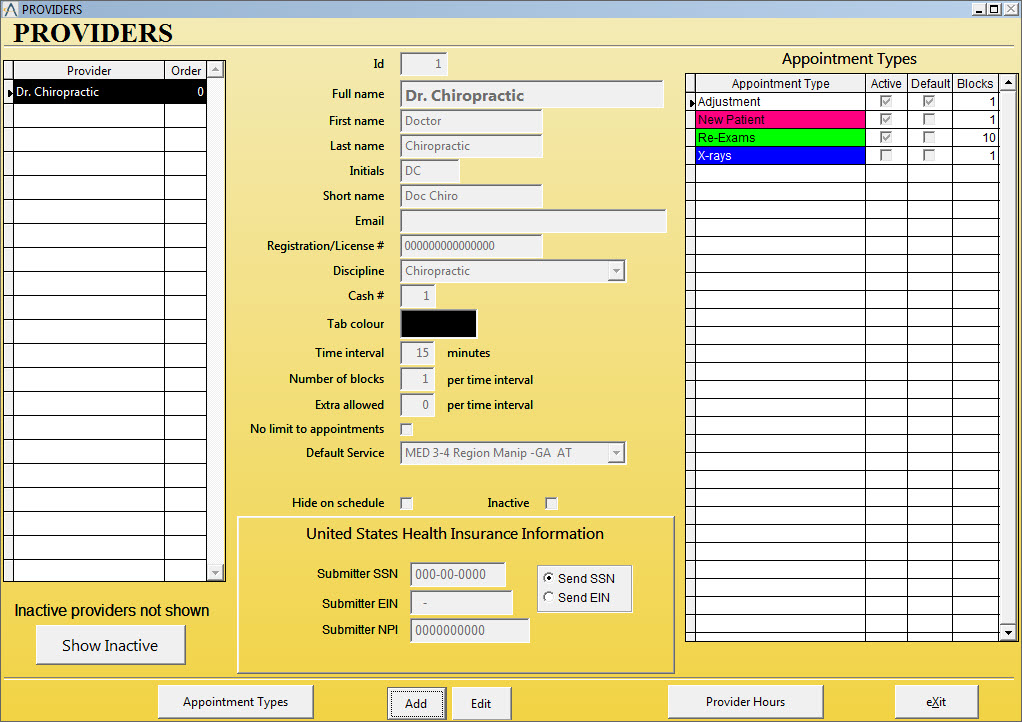
  1. Provider Details: area to EDIT or ADD Provider information – each entered Provider will have a separate tab on the Atlas schedule, be able to post charges and collect payments.
  • ID: the unique ID number assigned by Atlas to each Provider
  • Name: the full name of the Provider
  • First / Last Name: the first and last name of the Provider
  • Initials: Provider Initials (for best results, enter unique initials)
  • Short Name: Provider name formatted for Schedule tabs
  • Registration/License #: local registration or license number which will print on Patient Statements and Insurance forms as needed
  • Discipline: the discipline your Provider will belong to - which can be used to limit the information they can view in the VTC for each Patient
  • Cash #: Identification number of the CASH drawer for the Provider. NOTE: multiple CASH drawers can be created in System Information to separate CASH reports for Providers, as needed. In most situations, Providers can use one CASH drawer.
  • Tab Colour: the color you want the Provider tab to display on the Main Screen
  • Time Interval: interval between Appointment times, in minutes (ex: 15 minutes = 8:00 / 8:15 / 8:30)
  • Number of Blocks:  number of cells (columns) across in a time interval on the schedule (requires restart)
  • Extra Allowed: number of cells ‘hidden’ behind Patient demographic area on Appointment Matrix
  • Default Service: Service to be charged when the Provider presses POST ADJUSTMENT from the VTC (see TRANSACTIONS section)
  • Hide On Schedule: use this check box to create a Provider that you can bill transactions to, but who does not require a schedule to be created
  • Inactive: check this box to inactivate a Provider –inactive Providers will not display a schedule or be available for future billing but will remain on previous transactions
  1. Setup for Health Insurance: use this to enter Insurance numbers for specific Providers (see Insurance)
  2. Change Provider Order: on the Provider grid (located on the left of the screen) you can change the Provider order (the order their tabs display on the Main Screen) by changing the Order number scheme
  3. Appointment Types: be sure to select which Appointment Types are associated with each Provider and be sure to select a Default Appointment Type for each Provider (See Appointments for more details)
  4. Blocks: be sure that you assign the correct number of blocks to use per Appointment Type marked active. This is how we reflect how long each Appointment Type will take on your schedule. In this example the provider is setup for 15 minute time intervals, with 3 blocks across. The default appointment type is Adjustment, and it takes up 1 block on the schedule, which in this case will represent a 5 minute adjustment. You will be unable to leave this screen until all active appointments have their number of blocks configured.
  5. Provider Hours: click this button to configure each Providers default hours (See Provider Hours for more details)


Previous Page:
Email Settings
Next Page:
Provider Hours